A Follow-Up on Using the Radial Menu with My 3Dconnexion Mouse in FreeCAD
I’ve been using the radial menu button on my 3Dconnexion mouse in FreeCAD, and before diving into my overall impressions, I want to share some additional configurations I’ve added.
Along with setting up the Sketcher workbench, I also configured the Part Design workbench and added four tools, three from Part Design (New Sketch, Pad, and Loft) and one from the Draft workbench (Clone, not to be confused with the Part Design Clone, which is a very different tool).
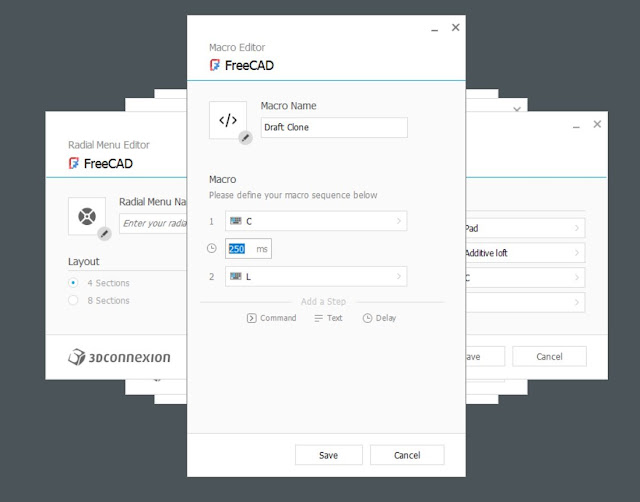
The Clone tool wasn’t initially available in the radial menus since the menu restricts itself to the workbench you’re currently in. While you can set up key shortcuts, most 3D packages require sequences of key combinations that can’t be entered into a single shortcut field. This is where the radial menu shines: it allows you to create and assign macros to a button by programming each key press along with custom millisecond pauses to build a flow.
In my case, I was able to add a step to press the ‘C’ key, pause briefly, then press the ‘L’ key. However, this didn’t work at first, and it wasn’t an issue with the mouse. The Draft tool, by default, isn’t accessible through the Part Design workbench in FreeCAD, so even shortcut combinations won’t work unless you customize the Part Design toolbar and add the tool manually. Once the tool is active in the toolbar, shortcuts become functional.
Here’s a quick video of me testing the mouse and radial menu with these settings:
Does It Add Value to My Workflow?
The answer is both yes and no.
When modeling, I usually have one hand on the keyboard, using shortcut keys as needed. But when teaching or training, I limit my shortcuts to just a few,Home to reset the view, Spacebar to show/hide objects, and Delete. Bombarding someone who’s new to FreeCAD with shortcuts isn’t the best teaching approach, especially in online settings where learners have diverse abilities and learning styles.
The human brain builds stronger neural connections when it can associate an action with a physical image, an icon with unique colors and names that appear on toolbars and menus. Shortcuts all look the same, making it easier to forget. Personally, I can only remember so many shortcuts before they slip away.
With the many operations and tools in a single workbench, having these options in a radial menu could be a game-changer. The default 4-selection radial menu layout doesn’t improve my workflow much, but the 8-selection layout shows real potential. That said, FreeCAD’s Pie Menu add-on (which I haven’t tried yet) might even replace the need for this mouse’s radial menu entirely. I might be able to activate the Pie Menu with the physical radial mouse button, I'll know once I install it.
Intelligent Switching & Macro Workflows
As I’ve mentioned before, this mouse features intelligent switching, which changes configurations based on the software and even the specific section you’re using. The 8-selection layout should accelerate workflows, especially combined with macros assigned directly on the mouse.
For users who don’t have time or interest in learning a macro language, this could be a game-changer. For example, my partner works with accounting spreadsheets daily and is already interested in this mouse. She could set up different radial menus tailored for repetitive tasks during specific reporting periods, all without learning complex scripting.
Using the 3Dconnexion Mouse with a SpaceMouse
When paired with a SpaceMouse, keyboard shortcuts become harder to use because one hand is on each device. Switching to the keyboard gets tricky, making the ability to customize radial menus even more valuable.
What’s Next?
I’ll keep experimenting with the 8-section radial menu layout and try different configurations. I’ll also see if I can get more comfortable using the SpaceMouse alongside this mouse. I’ll report back with updates soon.
Related Posts in This Series:
Stay tuned for more updates as I continue exploring this mouse and how it fits into my workflow! Have you tried a 3Dconnexion device? Share your experiences in the comments below.

Comments
Post a Comment