
Using Multiple Configurations in FreeCAD

This article explains how to setup and run #freeCAD with multiple configuration files.

In the past when teaching FreeCAD on my YouTube channel I often got asked where a toolbar is or why mine differ from the viewers. About 12 months ago I stop customising my toolbars and configuration as my channel supporters are my first priority when it comes to my FreeCAD work. I have now only just stumbled across the terminal commands to run FreeCAD with different options using the -u parameter. After a bit of reading I found I could run FreeCAD from different configurations. This allows me to set up a directory to hold the individual configs and then run different bash scripts to load FreeCAD and point it to the configuration of my liking. Below is an example of my Linux bash script I use to load my configuration 1.

All you need to do is supply the location of the configuration file with a specific switch, if one cannot be found then the default configuration is loaded. Once you have changed the config i.e. moved a toolbar then one will be created with the supplied name. This means I can experiment with configuration without worry about resetting each time. This also means that configurations can be made portable and backed up. 

Linux based OS:

I have two bash script each pointing to the same directory but to different configuration files.

Here is the contents of my bash file:

#!/bin/sh
~/Apps/FreeCAD_0.19.AppImage -u ~/Apps/freecadconfig/1.config

 This would need to be made executable to allow it to run.

Windows based OS:

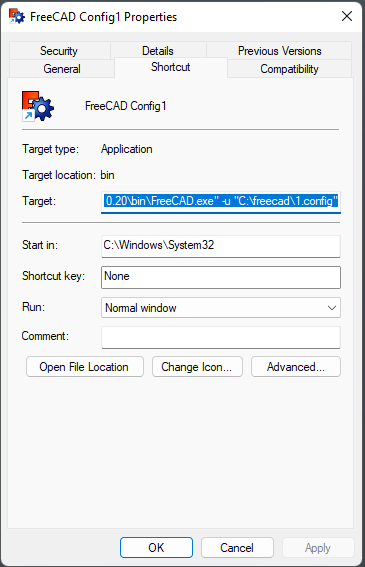
For windows create a shortcut link and edit the target by right clicking on the shortcut and selecting properties.  Next enter the following into the target.  You will need to modify the path to the freeCAD executable and the config file:

"C:\Program Files\FreeCAD 0.20\bin\FreeCAD.exe" -u "C:\freecad\1.config"


Now when you startup freeCAD it will create a config file at this location if one doesn't exists.  Create multiple shortcuts for any number of config files.


Comments

  1. I am sure I will try

    ReplyDelete
  2. How do you find the FreeCAD directory in Ubuntu jammy?

    ReplyDelete

Post a Comment

Popular posts from this blog

Beginners FreeCAD: Exercise 5.1 & 5.2 (Reference Images)

Welcome to the total beginners course to FreeCAD 0.20. In this is a two part lesson we will practice our tracing skill in the form of a mini project. Using the below reference photos we will create a more complex part which will consist of repeating features. We will utilise the symmetry tools to ease construction in both FreeCAD sketcher and Part Design workbench. This project work will help teach the fundamentals of freeCAD allowing a understanding of the basics but delivering this information via teaching you different workflows. In this tutorial we will be tracing photos imported into FreeCAD via the image workbench https://wiki.freecadweb.org/Image_Workbench JUMP TO IMAGES Do you want to purchase the complete series along with others and keep forever?  Check out my shop https://ko-fi.com/mang0/shop The story of this tutorial The idea and first attempt at creating this tutorial was back in FreeCAD 0.18.  The physical part itself, well, I have no idea what really it is, i...

FreeCAD For Beginners: CAD Thinking Part 1

Step-by-Step CAD Thinking FreeCAD Tutorial: Modeling a Latch Part (Part 1) Learning how to turn real life objects into CAD Models. Using FreeCAD we explain at a beginner level how to break down a physical object into its primitive shapes to digitise it into a 3D model, with this episode we are looking at a multi-part assembly, modelling each piece individually. The series aims to open your eyes and mind giving you the ground skills to pick the correct profiles, geometry and workflow when it comes to modelling your parts. This is not just for FreeCAD but for all CAD packages out there. Introduction This tutorial is the first in a series guiding you through modeling a latch assembly in FreeCAD (version 0.21) using the Part Design and A2Plus workbenches. It focuses on modeling the first part (a slotted component) by selecting the top profile to create a slot and adding side arcs, emphasizing CAD thinking to break down complex shapes into primitives. The tutorial highlights model stability...

Modeling Flowcharts For Basic Beginners FreeCAD v1

 Th following flowcharts are used in the Basic Beginners FreeCAD v1 course.  They consist of two flows, one for simplifying the model and one for identifying the individual features and how to model them.   The flowcharts can downloaded by clicking on them, they will then open in a new page, from there right click on the image and save as. Flowcharts can be found below.  Current flowchart version is version 1.0.0 Own my courses forever, check out my shop https://ko-fi.com/mang0/shop Own my courses forever,  check out my shop   https://ko-fi.com/mang0/shop