There is nothing like experimenting and seeing what happens when learning something new. For millennia humans have learnt by doing, learning through success and failure. This process is known simply as 'play'. FreeCAD offers a coding environment to allows you to do just that, it's called the Python Console.
To start our experimenting we need to make the necessary panels available. This will allow access to both the Python Console and the Report View.
Python Console
The Python Console allows us to enter and experiment with commands and to see what operations look like in code such as creating pads and pockets. The majority of these operations are translated and displayed in the panel as Python commands.
To show this panel we go to the top menu and click on:
View > Panels > Python Console
Report View
Any output that may result from executing our code, including those from FreeCAD itself, are displayed in the report view. Messages such as warnings of potential problems or incorrect input can be checked for and displayed . It also serves as a debugging tool, if we make an error in our code such as incorrect syntax then this is displayed along with which line and character position.
To show this panel we go to the top menu and click on:
View > Panels > Report View

These panels will now be available and docked to FreeCAD UI.

Anything we do will be converted to a Python commands and placed into the Python Console. Remember the setting we checked earlier? You can see in the screen shot a number of commands have already been output to the console. The first is when I selected the option to place FreeCAD in full screen mode before the demonstration. The next when I opened the customise menu option. Copying one of these commands and pasting it back into the console will result in it being replayed. The console uses the Python interpreter to convert code into actions.
Let's Give It A Try
Lets close down the report view and just concentrate on the Python Console. Click the x at the top right of the report view and clear the console to get rid of all that code, it's not necessary but it can get a bit cluttered in there.
- Place you mouse over the panel, right click and select 'clear console'

The panel will clear and the screen will looks like this.

The three chevrons >>> followed by a pipe | is where we start typing in commands.

Next create a simple cube to and modify its properties.
- Open the 'Part Workbench' using the drop down at the top of the screen which lists all the workbenches.

We now have a new scene. Now create a cube.
- Click on the cube icon in the main toolbar, a new cube will be created at origin 0,0,0 in your scene.

Notice a number of lines of text that have been added to the python console? These lines are the command used to create the cube. If you wanted to you can copy and paste these again in a new project to play these back and create the cube again. Let's carry on, right click and clear the console if you so desire
We will start to play with some of these commands. It's important that you type all commands as they are shown. Take note if the command has any white space or special characters within, matching the case of each character paying attention to lower and uppercase characters as you go.
Type the command:
FreeCAD
Do not add any spaces.


A scroll list box has popped up showing a number of properties, objects and functions that are associated with the command 'FreeCAD' This is know as something called 'intellisense'. Intellisense is a generic term used in most programming language that describe a multitude of feature including ones that help and guides the programmer to make the correct command choices.
Select 'ActiveDocument' from the popup or type it. So you know have:
FreeCAD.ActiveDocument
Now add a dot to the end of the command and observe the list of commands for the ActiveDocument command appear in the popup.


You will see the word 'unnamed' be returned in the Python Console. Look familiar? Look at the treeview on the left and observe the name of the document. It is called unnamed.
You have just created your first line of code. The command FreeCAD is what known as an 'API'. An Application Programming Interface allows you to access FreeCAD's internal commands, alter object properties and run the available commands on them. There are two in FreeCAD; FreeCAD and FreeCADGui API. The FreeCAD API allows you to alter properties of the document and object relevant to 3D space and the FreeCADGui API allows you to alter the visual look of an object such as its colour, line with, point size etc. It also allows you to control the user interface directly. Yes from code you can press a button or access the tree-view from code allowing you to automate tasks.
The FreeCAD API can also be accessed from the shortcut command 'App', they are both the same. You can see this when you use the Python Console to compare the two.

As you can see the same result:
'<module 'FreeCAD' (built in)>'
You have just used the Python Console to compare the types of an objects. Yet another use of this tool. We will be comparing types to understand the language as we move through the tutorials.
There is also a shorthand for the FreeCADGui API:
Gui

As you can see comparing the two pulls back the same object type. We will get to understand what object types are and why they are important.
What are all these commands and why do we access them with a dot?
So why do these commands popup when we add a dot? Well we are using something called 'dot notation'. FreeCAD organises shapes, objects and even the user interface itself into something called a 'object model'. Everything is a object, those object have properties, functions and child objects. Those child objects can have properties and function along with their own children, and so on. We can access these by using a dot. In this case our top level object is 'FreeCAD', followed by 'ActiveDocument', followed by 'Name' which is a property of the current active document, the one you created to add the cube to. Currently the name equals 'unnamed' as we haven't saved our document yet.
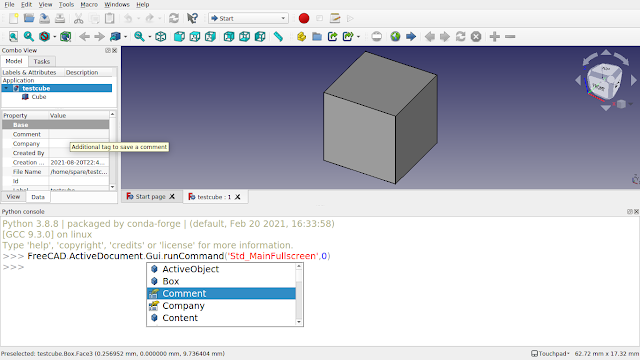
Have a look at what else is in available and compare it to the properties of the document in the treeview. Below show the relationship between the document property 'comment' in the treeview .
We just picked up the document name of the scene that we are currently editing. We can use ActiveDocment to access any object in the current scene. We are being implicit rather than explicit in the way we reference this object. This is important when we come save our document and give it a proper name. Lets look at two different way to access the cube, firstly:
obj = App.getDocument("Unnamed").getObject("Box")
This works until the file is saved which will cause the document name to change.

As you can see the document in the treeview is now called 'testcube' as I have just saved it. If we now run the command:
obj = App.getDocument("Unnamed").getObject("Box")
We get an error which basically means FreeCAD cant find a document with the name 'unnamed'.

obj = App.ActiveDocument.getObject("Box")
This will target the active document, the one that we are currently working on no matter what the document is called.

So why have we just typed a command and received no output? Not all commands produce an output, we have declared what's known as a 'variable' and associated it with our cube. If you typed in 'obj' into the console you will see the type of the new variable echoed back.

Enter the command:
obj
followed by a dot. Notice code completion has appeared, a sure sign that obj is now associated with something in FreeCAD. Start to type Height (remember case matters so make sure you start with a capital letter). Now hit enter and the height property will be echoed to the screen. In the screenshot I have selected the box and found the property on the data tab.

Let's change the 'Height' property via code type the following
obj.Height = 20
You will see the following, note the data tab Height property:

We are starting to understand we have the power to change properties of objects that we create in freeCAD. Normally we would click on them and change the properties in the data, now we can do this by code. Try changing the height via the data tab and running the obj.Height command again. You will see the new value returned. This shows that the variable obj is two way and has an association with our physical FreeCAD obj.
So what happens if we delete the object from screen? Well we still have an association with this object in memory. Delete your object and type 'obj' in the console. It's still there, let's try to access it's properties.

As you can see we can still get to the properties. This is because a copy still resides in memory which we are referencing. We have to be mindful of this. Reassigning the variable to another object or setting the variable to 'None' will release this.
Comments
Post a Comment